I have chosen to currently work on the more limited restoration project of the second Napoleonic miniature Almirall-Palou for my father, after the navy soldier already shown in a previous post. This time it is a dragoon of the Napoleonic Imperial Guard, also rather damaged.
I first focused on customizing the base, which I wanted to make more characteristic than the shabby look of the original; I had the opportunity to experiment with new techniques, which may also be useful for the basing of fantasy figures.
Looking at the Napoleonic period paintings, I was struck by the fact that, to increase the scenographic effect, the foreground often appears littered with broken weapons, abandoned equipment and dead and dying men - an element not far from reality of battlefields where hundreds of thousands of soldiers fought.
F. Gérard, "La bataille d'Austerlitz, 2 Décembre 1805" (1810)
Since one of the battles in which the dragoons of the Guard distinguished themselves was that of Wagram against Austria (5-6 July 1809), I decided to recall this event by placing on the base of my miniature a broken lance of the Austrian Ulans, who fought among the enemy ranks.

Having succeeded quite well, I propose below a tutorial on how to make a lance in the most linear way - even if in practice I have encountered various failures and consequent changes in strategy. Due to these uncertainties, I have not taken pictures of each step, but only of a few.
MATERIALS
1 toothpick
thin brass metal foil
Milliput
Green stuff
3 pins
Plasticard 0.4 mm thick
STEPS
1) THE GROOVE IN THE BASE
Coat the base with a thin layer of milliput and press a toothpick on it horizontally, which must leave a groove where you want to place the lance pole that has fallen to the ground.
I pressed the toothpick more in the front part of the base, so as to create a more pronounced groove on the front; in this way the lance in the final position will run diagonally across to the ground, to give greater dynamism to the whole and to bring out both the miniature and the lance itself.
2) THE POLE
I chose to use a toothpick for the lance because it has a diameter consistent with a figure of 54 mm and above all because, being made of wood, it can be broken with splinters. Cut the tip at one end of the toothpick with the knife; then measure the dimensions of the base, and calculate the length of the pole so that it protrudes a few millimeters both on the front and on the back of the base.
Then break the part of the toothpick that still has the tip, trying to obtain a break with various splinters. Gently intervene with the knife on the chip to accentuate it, creating further cracks and splinters, but being careful that they do not come off the toothpick. Reinforce this chipped end by sprinkling it with the brush with a layer of very thinned vinyl glue and allow to dry.
Engrave light non-straight slits along the entire surface of the pole with the knife, in order to create wood grain that facilitate the painting work.
At the opposite end, which has a clean cut, drill a hole with a diameter just over a pin and a depth of 3-4 mm. Check that the pin enters easily, but does not move too much.
3) THE PENNON
Draw on the metal foil the outline of the flag of appropriate size for the scale of the miniature and the base on which it will be positioned (in my case 12x30 mm, considering that the end of the ulan pennon is divided into two points). Remember to include a part that will be folded around the shaft.
Cut the metal foil with a knife according to the shape and with a knife, scissors, various points, make cuts, irregular holes, openings in some points of the flag, to give it a worn look.
Roll the flat end of the flag around the toothpick, leaving a couple of millimeters uncovered on the part of the shaft with the clean cut. Then with long nose pliers undulate the sheet metal until it has taken on the appearance of a fabric thrown randomly on the ground, following the shape of the ground and any obstacles that will be found under it (I made sure that the flag covers the toe of the dragoon's boot and then descend out of the base). Try the effect several times by placing the shaft with the pennon in position on the base, until you are satisfied.
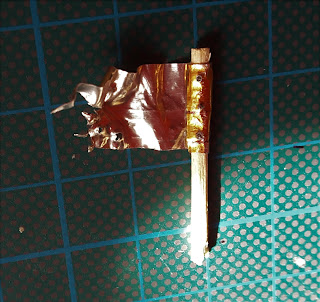
4) THE RIVETS
Holding the pennon still around the pole, drill three holes through the metal foil and the wood of the toothpick, equidistant from each other and with the diameter of a pin (in my case 0.3 mm). Insert the pins with the head in the upper part and pull the lower part with the pliers, so that the head of the pins on the other side slightly deforms the surface of the metal foil, as if it were a fabric nailed to the pole. Then cut the part of the protruding pins as close as possible to the point where they come out of the toothpick and keep what is cut away. Remove the pins from the head, sprinkle them with cyanoacrylate glue and reinsert them: they will keep the pennon secured to the pole.
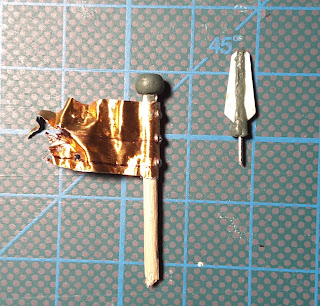
5) THE HEAD
And now the most complex phase: the head. To get inspiration, I found photos of real nineteenth-century Ulan spearheads that still exist as a model.

As you can see, it is made up of three parts, to be made separately: a metal bar that connects the head to the pole, a metal globe and finally the actual head.
First, very carefully make a slight groove parallel to the shaft in the few millimeters that separate the end of the toothpick from the edge of the pennon: a depth of 0.5 mm by 0.5 mm will suffice. Using the green stuff (or even plasticard) create a thin strip that represents the metal bar and let it dry.
Secondly, make a sphere with the green stuff, flatten the top and bottom, make a through hole with a pin and let it dry.
For the head, take a left part of one of the three pins and possibly shorten it, so that it has a length of about 20 mm, and in any case includes the length of the head, the globe and a few millimeters so that it fits into the pole. Cut out two trapezoidal sides of the spearhead in the plasticard; don't worry about sharp edges, there will be time to smooth them out later. Sprinkle the pin part inserted into a cork for support generously with cyanoacrylate glue and attach the two sides of plasticard, trying to align them; leave to dry for at least 10 minutes. Add very carefully and delicately, in order not to detach the plasticard, strips of green material along the two sides of the pin and working them in such a way as to make them more tapered towards the tip and more massive at the base, until they are joined in a cylinder at the base . Smooth and dry.

6) FINAL ASSEMBLY
To assemble everything, sprinkle the strip of green matter with the cyanoacrylate glue and insert it into the slot previously made in the toothpick. On one side of the sphere, enlarge the hole already made with the pin with a drill bit of the same diameter as the toothpick, sprinkle the hole with glue and lightly insert it on the toothpick.
Finally, finish the tip by smoothing the green stuff and filing the edges of the tip. Then check that it fits snugly into the hole in the sphere and the bottom edge of the tip matches the top of the ball. Sprinkle the part of the pin left naked with glue and insert it into the hole of the sphere, and assembly is complete.
And here is the Ulan lance primed and in position at the foot of our dragoon, ready to be painted!
__________________________________________________________________________
Ho scelto di lavorare attualmente al più limitato progetto di
restauro della seconda miniatura napoleonica Almirall-Palou per mio padre, dopo il fante di marina già oggetto di un post precedente. Questa
volta si tratta di un dragone della Guardia imperiale napoleonica, anch’esso piuttosto rovinato.
Mi sono innanzitutto concentrato sulla personalizzazione
della base, che ho voluto rendere più caratteristica rispetto all'aspetto squallido dell’originale; ho avuto modo di sperimentare tecniche nuove, che potranno essere
utili anche per l’imbasettamento di figure fantasy.
Guardando i quadri d'epoca napoleonica, sono stato colpito
dal fatto che, per aumentare l’effetto scenografico, in primo piano il terreno appare
spesso cosparso di armi rotte, equipaggiamento abbandonato e uomini morti e morenti –
un elemento in fondo non lontano dalla realtà di campi di battaglia in cui
combatterono centinaia di migliaia di soldati.
F. Gérard, "La bataille d'Austerlitz, 2 Décembre 1805" (1810)
Dato che una delle battaglie in cui si distinsero i dragoni
della Guardia fu quella di Wagram contro l'Austria (5-6 luglio 1809), ho deciso
di rievocare questo evento ponendo sulla base della mia miniatura una lancia
spezzata degli ulani austriaci, che combatterono tra le fila nemiche.
Essendo riuscita abbastanza bene, propongo di seguito un
tutorial su come realizzare la lancia nel modo più lineare - anche se nella pratica io mi sono scontrato con vari
fallimenti e conseguenti cambiamenti di strategia. Alla luce di queste
incertezze, non ho scattato foto di ogni passaggio, ma solo di alcuni.
MATERIALI
1 stuzzicadenti
1 foglio di lamiera sottile
Milliput
Materia verde
3 spilli
Plasticard spessore 0,4 mm
FASI
1) LA SEDE NELLA BASE
Rivestire la base di un sottile strato di milliput, e premere su di esso in orizzontale uno stuzzicadenti,
che deve lasciare un’impronta dove si vuole collocare l’asta della lancia caduta
a terra.
Io ho premuto maggiormente lo stuzzicadenti nella parte
anteriore della base, così da creare un solco più accentuato sul davanti; in
questo modo la lancia nella posizione finale avrà un andamento leggermente diagonale
rispetto al terreno, per dare maggior dinamicità all’insieme e far risaltare
sia la miniatura che la lancia stessa.
2) L’ASTA
Ho scelto di utilizzare per l’asta uno stuzzicadenti perché
di diametro coerente con una figura di 54 mm e soprattutto perché, essendo di
legno, può essere spezzato in modo non netto. Tagliare con il coltello la punta
ad un’estremità dello stuzzicadenti; poi misurare le dimensioni della base, e
calcolare la lunghezza dell’asta in modo che sporga di qualche millimetro sia
sulla parte anteriore che su quella posteriore della base.
Spezzare quindi la parte dello stuzzicadenti che ha ancora
la punta, cercando di ottenere una rottura con varie schegge. Intervenire con
delicatezza con il coltello sulla scheggiatura per accentuarla, creando
ulteriori fessure e schegge, ma stando attenti che esse non si stacchino dallo
stuzzicadenti. Rafforzare questa estremità scheggiata cospargendola con il
pennello con un sottile velo di colla vinilica molto diulita e lasciar seccare.
Praticare lungo tutta la superficie dell’asta leggere
fessure non rettilinee con il coltello, in modo da creare venature del legno
che facilitino il lavoro di pittura.
Nell’estremità opposta, che ha un taglio netto,
praticare un foro del diametro poco superiore ad uno spillo e della profondità
di 3-4 mm. Controllare che lo spillo vi entri con facilità, senza però muoversi
troppo.
3) IL PENNONE
Disegnare sul foglio di lamiera il contorno della bandiera
di dimensioni appropriate alla scala della miniatura e alla base su cui sarà
posizionata (nel mio caso 12x30 mm, considerando che l’estremità del
pennone ulano è diviso in due punte). Ricordarsi di comprendere una parte che
andrà ripiegata attorno all’asta.
Tagliare con il coltello la lamiera secondo la sagoma e con
coltello, forbici, punte varie praticare tagli, fori irregolari, slabbrature in
alcuni punti della bandiera, per dargli un’aspetto vissuto.
Arrotolare l’estremità piatta della bandiera attorno
allo stuzzicadenti, lasciando un paio di millimetri scoperti rispetto alla
parte dell’asta con il taglio netto. Poi con le pinze a becco ondulare la
lamiera fino a quando non ha assunto l’aspetto di un tessuto buttato
casualmente a terra, seguendo la forma del terreno e di eventuali ostacoli che
i troveranno sotto di essa (io ho fatto sì che la bandiera
ricoprisse la punta dello stivale del dragone e poi scendesse fuoriuscendo
dalla base). Provare più volte l’effetto mettendo l’asta con la bandiera in
posizione sulla base, fino a quando non si è soddisfatti.
4) I RIVETTI
Tenendo fermo il pennone attorno all’asta praticare
tre fori passanti attraverso la lamiera e il legno dello stuzzicadenti,
equidistanti tra loro e del diametro di uno spillo (nel mio caso 0,3 mm).
Inserirvi gli spilli con la testa nella parte superiore e tirare la parte
inferiore con le pinze, in modo che la testa degli spilli dall’altra parte
deformi leggermente la superficie della lamiera, come se fosse un
tessuto inchiodato all’asta. Tagliare quindi la parte degli spilli sporgenti il
più possibile a ridosso del punto in cui escono dallo stuzzicadenti e
conservare ciò che viene tagliato via. Estrarre gli spilli dalla testa, cospargerli di
colla cianoacrilica e reinserirli: essi terranno assicurato il pennone all’asta.
5) LA PUNTA
E ora la fase più complessa: la punta. Per ispirarmi ho
preso a modello foto di reali punte di lancia ulane dell’Ottocento ancora
esistenti.

Come si può vedere, essa è costituita di tre parti, da
realizzare separatamente: una barra metallica che collega la punta all’asta, un
globo metallico e infine la punta vera a propria.
Per prima cosa praticare con molta cautela un leggero solco
parallelo all’asta nei pochi millimetri che separano l’estremità dello
stuzzicadenti dal margine della bandiera: basterà una profondità di 0,5 mm per
0,5 mm. Realizzare con la materia verde (o anche con il plasticard) una sottile
striscia che rappresenta la barra metallica e lasciar asciugare.
Secondariamente, fare una sfera con la materia verde,
appiattire la parte superiore e inferiore, fare un foro passante con lo spillo e
lasciar seccare.
Per la punta prendere una parte avanzata di uno dei tre
spilli ed eventualmente accorciarlo, in modo che abbia una lunghezza di circa
20 mm, e comunque comprenda la lunghezza della punta, del globo e qualche
millimetro perche’ si inserisca nell’asta. Ritagliare nel plasticard due lati
della punta di lancia di forma trapezioidale; non preoccuparsi degli spigoli
vivi, ci sarà tempo per smussarli poi. Cospargere generosamente di colla
cianoacrilica la parte di spillo infilata in un tappo di sughero per supporto e
attaccare i due lati di plasticard, cercando di allinearli; lasciar asciugare
almeno 10 minuti. Aggiungere con molta attenzione e delicatezza, per non
staccare il plasticard, delle strisce di materia verde lungo i due lati dello
spillo e lavorandole in modo da renderle più rastremate verso l’apice e più
massicce alla base, fino ad unirle in un cilindro alla base. Lisciare e far
asciugare.

6) ASSEMBLAGGIO FINALE
Per montare il tutto, cospargere la striscetta di materia
verde con la colla cianoacrilica e inserirla nella fessura in precedenza
realizzata nello stuzzicadenti. Su un lato della sfera allargare il foro già
praticato con lo spillo con una punta di trapano dello stesso diametro dello
stuzzicadenti, cospargere il foro con la colla e inserirlo leggermente sullo
stuzzicadenti.
Infine rifinire la punta lisciando la materia verde e limando
gli spigoli della punta. Poi controllare che essa si inserisca bene nel buco
della sfera e il margine inferiore della punta combaci con il lato superiore
della palla. Cospargere la parte di spillo rimasta nuda con la colla e
inserirla nel buco della sfera, e l’assemblamento è concluso.
Ed ecco la lancia ulana primerata e in posizione ai piedi del nostro dragone, pronta per essere dipinta!