lunedì 21 marzo 2022

R&D: A GNOLL IN THE WILD AND A LANDING ON DISCWORLD/ UNO GNOLL NEL FOLTO DELLA FORESTA E UN ATTERRAGGIO SU MONDODISCO

   Lacking any news for the painting of miniatures, we present two "extravagances" related to our fantasy interests.
    The first is a gnoll that D made of clay for R earlier this year - look at his grim expression as he wanders through the forest armed with a spear!


He is certainly a veteran of many raids considering the scars on his face!


    Taking advantage of the suggestions of Rob (Malacassa), D received two books of Terry Pratchett's Discworld, which were given to her by a friend of the family: "The Colour of Magic" and "Equal Rites".


    The covers of the latest Italian edition are less appealing than the illustrations of the English originals, but never mind ... It will be an entry into a new world for us, anyway. It is now up to D to decide whether to start following the adventures of Rincewind, or be guided by Granny Weatherwax!


_________________________________________________________________

    In mancanza di novità per la pittura delle miniature, presentiamo due "stravaganze" relative ai nostri interessi fantasy.
    La prima è uno gnoll che D ha realizzato con la plastilina per R all'inizio dell'anno: guardate la sua espressione truce mentre si aggira per la foresta armato di lancia!


    Si  tratta senz'altro di un veterano di molte razzie considerate le cicatrici che ha sul muso!


    Facendo tesoro dei suggerimenti di  Rob (Malacassa), D ha poi ricevuto due libri di Mondo Disco di Terry Pratchett, che le sono stati regalati da un'amica di famiglia: "Il colore della magia" e "L'arte della magia". 


    Le copertine dell'ultima edizione italiana sono meno attraenti rispetto alle illustrazioni degli originali inglesi, ma pazienza... Sarà comunque un ingresso in un mondo nuovo per noi. Sta ora a D decidere se iniziare seguendo le avventure di Scuotivento, oppure farsi guidare Nonnina Weatherwax!

martedì 1 marzo 2022

R: IN A COUNTRY CHURCHYARD: RENEDRA AND CITADEL GRAVESTONES REVIEW / IN UN CIMITERO CAMPESTRE: RECENSIONE DI LAPIDI RENEDRA E CITADEL


                                                                             "where heaves the turf in many a molding heap,
                                                                                                            each in his narrow cell for ever laid,
                                                                                                           the rude forefathers of the hamlet sleep."

                                                                                                    T. Gray, Elegy written in a country churchyard (1751)


    Finally returning to the fantasy world and my band of Nuthgnawers, I would like to present in this post the review of gravestones and tombs that I have selected as elements for the basing. In fact, I planned that about a third of my gnoll/dogman warband will have breached a country cemetery in the northwestern area of ​​Averland, and I therefore collected accessories that would inspire me to create a coherent setting.


J. Constable, "Stoke Poges Church, Buckinghamshire". Illustration to T. Gray's Elegy (1833)


    Among the many manufacturers who make gravestones and tombs as scenic elements, I basically followed two criteria in my choice. The tombs should not have been too imposing and elaborate, because I imagined the place of my "mosaic" as a peripheral graveyard and because materially each tomb had to enter together with a miniature on a 25x25 mm base. I also wanted to avoid tombs that had an excessively 'Gothic' appearance (in the literary sense of the term) and that seemed too much the foregone setting of a vampire story.

A) RENEDRA


    I therefore focused primarily on a set of gravestones sculpted by Steve May and produced by RENEDRA, conceived for historical models rather than fantasy.


    The set consists of two identical sprues with 28 elements each, which allow the creation of at least 40 burials in total: most of them are gravestones, memorial stones and bases, with even a larger slab tomb. Exceptions are a bird (which should vaguely be a raven) and a milestone.


    The strong point is in my opinion that a package offers a very varied set of gravestones in size and shape, so that you can find the one that best suits each miniature. From the following photo we can see how they are perfectly proportioned for a human miniature of 28 mm at eye level - eh, yes... still the Felix of D - and instead appear smaller next to most of the gnolls/dogmen (which, remember, are larger than human stature), but without being tiny.


Five different types of RENEDRA gravestones


    My evaluation of this set of gravestones is therefore very positive, even if I have to underline two negative sides:
- (in general) most are carved only on the front side, while the back is smooth. This is fine if the accessory is to be placed on a wall or building, but not if it must be viewed all around;
- (for fantasy) some have clear Christian symbols, having the cross shape or having the cross carved on them. Although the patent cross is an Imperial symbol in the world of Warhammer, for my needs I will have to discard some of them or modify them to make them more suitable for the latter universe.

B) BITS FROM CITADEL BOXES

B1) GRAVESTONES FROM ZOMBIES AND SKELETON WARRIORS

    I had the opportunity to add individual bits from other more or less recent Citadel sprues to the Renedra set, and first of all two tombstones taken respectively from old sets of zombies and skeleton warriors. The two types are about the size of the smaller Renedra gravestones, but still appear compatible. Used in combination with the previous set, they introduce further variations and have the advantage of being sculpted on both sides.


Gravestones (from left to right): 1 CITADEL Zombie regiment, 1 CITADEL Skeleton warriors, 3 RENEDRA


B2) TOMBS FROM WARHAMMER QUEST: CURSED CITY

    The more elaborate pieces, however, are those of Warhammer Quest: Cursed City, which are not actually conceived as elements of scenery, but as an integral part of the zombie miniatures who carry their ancient tomb on their shoulders. The tombs are certainly attractive for the variety and richness of detail, from candles, scrolls, flowers, up to a crow with an eye in its beak... However, they have the disadvantage of being, like the miniatures themselves, thinner and smaller compared to previous Citadel ones. Also for my needs some tombs have a little rural aspect, and therefore I believe that I will make a limited use of them.


Tombs (from left to right): 1 CITADEL Cursed City, 1 CITADEL Zombie regiment, 1 CITADEL Skeleton warriors, 1 RENEDRA, 3 CITADEL Cursed City


B3) TOMB SLABS FROM THE SIGMARITE MAUSOLEUM

    To conclude, I also wanted a tomb slab that could be compact, but in the meantime a little more elaborate, so as to perhaps distinguish the burial of a more illustrious person from the simplicity of other common burials. I was able to find individual pieces of CITADEL Sigmarite mausoleum, which contain various slabs, broken or intact. Probably part of one of them will be reused for my graveyard desecrated by furious (and hungry!) dogmen.


POST SCRIPTUM: A heartfelt thanks to D for the usual loan of her precioussss Felix, and for taking almost all the photos in the post, using her brand new tablet holder!

______________________________________________________________________


                                                                           "dove il terreno si solleva in cumuli marcescenti,
                                                                                                         ognuno giace per sempre nella sua stretta cella,
                                                                                                         dormono i rozzi antenati del borgo."

                                                                                            T. Gray, Elegia scritta in un cimitero campestre (1751)

    Tornando finalmente al mondo fantasy e alla mia banda di Nuthgnawers, vorrei presentare in questo post la recensione di lapidi e tombe che ho selezionato come elementi per l’imbasettamento. Ho infatti programmato che circa un terzo della mia banda di gnoll/uomini cane avrà violato un cimitero di campagna nella zona nord-occidentale dell’Averland, ed ho quindi raccolto accessori che mi ispirassero per creare un’ambientazione coerente.


J. Constable, "Stoke Poges Church, Buckinghamshire". Illustrazione dell'Elegia di T. Gray (1833)


    Tra i molti produttori che realizzano lapidi e tombe come elementi scenici, ho seguito nella mia scelta sostanzialmente due criteri. Le tombe non dovevano essere troppo imponenti ed elaborate, perché ho immaginato il luogo del mio “mosaico” come un cimitero periferico e perché materialmente ogni tomba doveva entrare assieme ad una miniatura su una base di 25x25 mm.  Volevo inoltre evitare tombe che avessero un aspetto eccessivamente ‘gotico’ (nel senso letterario del termine) e che sembrassero fin troppo l’ambientazione scontata di una storia di vampiri.

A) RENEDRA


    Mi sono quindi orientato in primo luogo verso un set di tombe scolpito da Steve May e prodotto da RENEDRA, concepito per il modellismo storico prima che per il fantasy.


    Il set è composto da due matarozze identiche con 28 elementi ciascuna, che permettono la realizzazione di almeno 40 sepolture in totale: la maggior parte sono lapidi, cippi e basi, con anche una più grande una lastra tombale terragna. Eccezioni sono invece un uccello (che dovrebbe vagamente essere un corvo) e un cippo miliare.


    Il punto di forza è a mio avviso che una confezione offre un insieme di lapidi molto vario per dimensioni e forme, così che si può trovare quella che si adatta meglio ad ogni miniatura. Dalla foto seguente si ricava come esse siano perfettamente proporzionate per una miniatura umana da 28 mm all’altezza degli occhi - eh, sì…sempre il Felix di D - ed appaiano invece più piccole accanto alla maggior parte degli gnoll/uomini cane (che, ricordo, ha dimensioni maggiori della statura umana), senza però risultare minuscole.


Cinque tipi diversi di lapidi RENEDRA


    La mia valutazione di questo set di tombe è quindi assai positiva, anche se devo sottolineare due lati negativi:
- (in generale) la maggior parte è scolpita solo sul lato anteriore, mentre il posteriore è liscio. Questo va bene se l’accessorio va posto addosso ad un muro o a un edificio, ma non se deve essere visto a 360 gradi;
- (per il fantasy) alcune hanno chiari simboli cristiani, avendo la forma croce o avendo la croce scolpita su di esse. Anche se la croce patente è un simbolo imperiale nel mondo di Warhammer, per le mie esigenze dovrò scartarne alcune o modificarle per renderle più adeguate a quest'ultimo universo.


B) PEZZI DALLE SCATOLE CITADEL


B1) LAPIDI DEGLI ZOMBIE E DEI GUERRIERI SCHELETRI


    Ho avuto la possibilità di aggiungere al set Renedra singoli pezzi da altre materozze CITADEL più o meno recenti, ed innanzitutto due lapidi prese rispettivamente da vecchi set di zombie e guerrieri scheletri. I due tipi sono delle dimensioni delle lapidi più piccole del set Renedra, ma appaiono comunque compatibili. Usate in combinazione con il set precedente, introducono ulteriori varianti ed hanno il vantaggio di essere scolpite su entrambi i lati.


Lapidi (da destra a sinistra): 1 CITADEL Reggimento zombie, 1 CITADEL Guerrieri scheletri, 3 RENEDRA


B2) TOMBE DI WARHAMMER QUEST: CITTA' MALEDETTA
 
   I pezzi più elaborati sono però quelli di Warhammer Quest: Città maledetta, che in realtà non sono concepiti come elementi di scenario, ma come parte integrante delle miniature di zombie che si portano sulle spalle il loro antico sepolcro. Le tombe sono sicuramente attraenti per la varietà e la ricchezza di dettagli, dalle candele, ai cartigli, ai fiori, fino a un corvo con un occhio nel becco.. Hanno però lo svantaggio di essere, come le miniature stesse, più esili e piccole rispetto ai precedenti Citadel. Inoltre per le mie esigenze alcune tombe hanno un aspetto poco rurale, e quindi credo che ne farò un uso limitato.


Lapidi (da destra a sinistra): 1 CITADEL Città maledetta, 1 CITADEL Reggimento zombie, 1 CITADEL Guerrieri scheletri, 1 RENEDRA, 3 CITADEL Città maledetta


B3) TOMBE DEL MAUSOLEO SIGMARITA

    Per concludere, volevo anche una lastra tombale terragna che potesse essere compatta, ma nel frattempo un poco più elaborata, perché distinguesse magari la tomba di un personaggio più illustre rispetto alla semplicità delle altre sepolture comuni. Sono riuscito a trovare pezzi singoli del mausoleo di Sigmar CITADEL, che contengono varie lastre, spezzate o intatte. Probabilmente parte di una di esse sarà riutilizzata per il mio cimitero profanato da uomini cane furiosi (e affamati!). 


POST SCRIPTUM: Un sentito ringraziamento a D per il consueto prestito del suo tesssoro Felix, e per aver effettuato quasi tutte le foto del post, avvalendosi del suo nuovissimo supporto per tablet!


sabato 19 febbraio 2022

R: HOW TO MAKE A BROKEN CAVALRY LANCE/ COME REALIZZARE UNA LANCIA DI CAVALLERIA SPEZZATA

    I have chosen to currently work on the more limited restoration project of the second Napoleonic miniature Almirall-Palou for my father, after the navy soldier already shown in a previous post. This time it is a dragoon of the Napoleonic Imperial Guard, also rather damaged.


    I first focused on customizing the base, which I wanted to make more characteristic than the shabby look of the original; I had the opportunity to experiment with new techniques, which may also be useful for the basing of fantasy figures.
    Looking at the Napoleonic period paintings, I was struck by the fact that, to increase the scenographic effect, the foreground often appears littered with broken weapons, abandoned equipment and dead and dying men - an element not far from reality of battlefields where hundreds of thousands of soldiers fought.


F. Gérard, "La bataille d'Austerlitz, 2 Décembre 1805" (1810)


    Since one of the battles in which the dragoons of the Guard distinguished themselves was that of Wagram against Austria (5-6 July 1809), I decided to recall this event by placing on the base of my miniature a broken lance of the Austrian Ulans, who fought among the enemy ranks.


    Having succeeded quite well, I propose below a tutorial on how to make a lance in the most linear way - even if in practice I have encountered various failures and consequent changes in strategy. Due to these uncertainties, I have not taken pictures of each step, but only of a few.

MATERIALS


1 toothpick
thin brass metal foil
Milliput
Green stuff
3 pins
Plasticard 0.4 mm thick

STEPS


1) THE GROOVE IN THE BASE

Coat the base with a thin layer of milliput and press a toothpick on it horizontally, which must leave a groove where you want to place the lance pole that has fallen to the ground.
I pressed the toothpick more in the front part of the base, so as to create a more pronounced groove on the front; in this way the lance in the final position will run diagonally across to the ground, to give greater dynamism to the whole and to bring out both the miniature and the lance itself.


2) THE POLE

I chose to use a toothpick for the lance because it has a diameter consistent with a figure of 54 mm and above all because, being made of wood, it can be broken with splinters. Cut the tip at one end of the toothpick with the knife; then measure the dimensions of the base, and calculate the length of the pole so that it protrudes a few millimeters both on the front and on the back of the base.

Then break the part of the toothpick that still has the tip, trying to obtain a break with various splinters. Gently intervene with the knife on the chip to accentuate it, creating further cracks and splinters, but being careful that they do not come off the toothpick. Reinforce this chipped end by sprinkling it with the brush with a layer of very thinned vinyl glue and allow to dry.
Engrave light non-straight slits along the entire surface of the pole with the knife, in order to create wood grain that facilitate the painting work.
At the opposite end, which has a clean cut, drill a hole with a diameter just over a pin and a depth of 3-4 mm. Check that the pin enters easily, but does not move too much.


3) THE PENNON

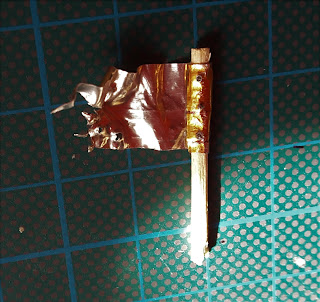
Draw on the metal foil the outline of the flag of appropriate size for the scale of the miniature and the base on which it will be positioned (in my case 12x30 mm, considering that the end of the ulan pennon is divided into two points). Remember to include a part that will be folded around the shaft.
    Cut the metal foil with a knife according to the shape and with a knife, scissors, various points, make cuts, irregular holes, openings in some points of the flag, to give it a worn look.
    Roll the flat end of the flag around the toothpick, leaving a couple of millimeters uncovered on the part of the shaft with the clean cut. Then with long nose pliers undulate the sheet metal until it has taken on the appearance of a fabric thrown randomly on the ground, following the shape of the ground and any obstacles that will be found under it (I made sure that the flag covers the toe of the dragoon's boot and then descend out of the base). Try the effect several times by placing the shaft with the pennon in position on the base, until you are satisfied.


4) THE RIVETS

    Holding the pennon still around the pole, drill three holes through the metal foil and the wood of the toothpick, equidistant from each other and with the diameter of a pin (in my case 0.3 mm). Insert the pins with the head in the upper part and pull the lower part with the pliers, so that the head of the pins on the other side slightly deforms the surface of the metal foil, as if it were a fabric nailed to the pole. Then cut the part of the protruding pins as close as possible to the point where they come out of the toothpick and keep what is cut away. Remove the pins from the head, sprinkle them with cyanoacrylate glue and reinsert them: they will keep the pennon secured to the pole.


5) THE HEAD

And now the most complex phase: the head. To get inspiration, I found photos of real nineteenth-century Ulan spearheads that still exist as a model.


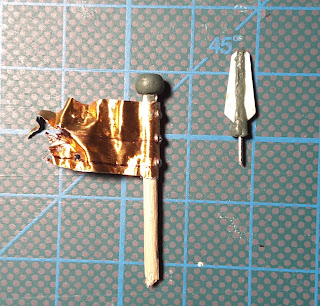
As you can see, it is made up of three parts, to be made separately: a metal bar that connects the head to the pole, a metal globe and finally the actual head.
    First, very carefully make a slight groove parallel to the shaft in the few millimeters that separate the end of the toothpick from the edge of the pennon: a depth of 0.5 mm by 0.5 mm will suffice. Using the green stuff (or even plasticard) create a thin strip that represents the metal bar and let it dry.
    Secondly, make a sphere with the green stuff, flatten the top and bottom, make a through hole with a pin and let it dry.
    For the head, take a left part of one of the three pins and possibly shorten it, so that it has a length of about 20 mm, and in any case includes the length of the head, the globe and a few millimeters so that it fits into the pole. Cut out two trapezoidal sides of the spearhead in the plasticard; don't worry about sharp edges, there will be time to smooth them out later. Sprinkle the pin part inserted into a cork for support generously with cyanoacrylate glue and attach the two sides of plasticard, trying to align them; leave to dry for at least 10 minutes. Add very carefully and delicately, in order not to detach the plasticard, strips of green material along the two sides of the pin and working them in such a way as to make them more tapered towards the tip and more massive at the base, until they are joined in a cylinder at the base . Smooth and dry.


6) FINAL ASSEMBLY

    To assemble everything, sprinkle the strip of green matter with the cyanoacrylate glue and insert it into the slot previously made in the toothpick. On one side of the sphere, enlarge the hole already made with the pin with a drill bit of the same diameter as the toothpick, sprinkle the hole with glue and lightly insert it on the toothpick.


    Finally, finish the tip by smoothing the green stuff and filing the edges of the tip. Then check that it fits snugly into the hole in the sphere and the bottom edge of the tip matches the top of the ball. Sprinkle the part of the pin left naked with glue and insert it into the hole of the sphere, and assembly is complete.


    And here is the Ulan lance primed and in position at the foot of our dragoon, ready to be painted!


__________________________________________________________________________

    Ho scelto di lavorare attualmente al più limitato progetto di restauro della seconda miniatura napoleonica Almirall-Palou per mio padre, dopo il fante di marina già oggetto di un post precedente. Questa volta si tratta di un dragone della Guardia imperiale napoleonica, anch’esso piuttosto rovinato.


    Mi sono innanzitutto concentrato sulla personalizzazione della base, che ho voluto rendere più caratteristica rispetto all'aspetto squallido dell’originale; ho avuto modo di sperimentare tecniche nuove, che potranno essere utili anche per l’imbasettamento di figure fantasy.

    Guardando i quadri d'epoca napoleonica, sono stato colpito dal fatto che, per aumentare l’effetto scenografico, in primo piano il terreno appare spesso cosparso di armi rotte, equipaggiamento abbandonato e uomini morti e morenti – un elemento in fondo non lontano dalla realtà di campi di battaglia in cui combatterono centinaia di migliaia di soldati.


F. Gérard, "La bataille d'Austerlitz, 2 Décembre 1805" (1810)


    Dato che una delle battaglie in cui si distinsero i dragoni della Guardia fu quella di Wagram contro l'Austria (5-6 luglio 1809), ho deciso di rievocare questo evento ponendo sulla base della mia miniatura una lancia spezzata degli ulani austriaci, che combatterono tra le fila nemiche.


    Essendo riuscita abbastanza bene, propongo di seguito un tutorial su come realizzare la lancia nel modo più lineare - anche se nella pratica io mi sono scontrato con vari fallimenti e conseguenti cambiamenti di strategia. Alla luce di queste incertezze, non ho scattato foto di ogni passaggio, ma solo di alcuni.

MATERIALI

1 stuzzicadenti

1 foglio di lamiera sottile

Milliput

Materia verde

3 spilli

Plasticard spessore 0,4 mm


FASI

1) LA SEDE NELLA BASE

Rivestire la base di un sottile strato di milliput, e premere su di esso in orizzontale uno stuzzicadenti, che deve lasciare un’impronta dove si vuole collocare l’asta della lancia caduta a terra.
Io ho premuto maggiormente lo stuzzicadenti nella parte anteriore della base, così da creare un solco più accentuato sul davanti; in questo modo la lancia nella posizione finale avrà un andamento leggermente diagonale rispetto al terreno, per dare maggior dinamicità all’insieme e far risaltare sia la miniatura che la lancia stessa.


2) L’ASTA

Ho scelto di utilizzare per l’asta uno stuzzicadenti perché di diametro coerente con una figura di 54 mm e soprattutto perché, essendo di legno, può essere spezzato in modo non netto. Tagliare con il coltello la punta ad un’estremità dello stuzzicadenti; poi misurare le dimensioni della base, e calcolare la lunghezza dell’asta in modo che sporga di qualche millimetro sia sulla parte anteriore che su quella posteriore della base.
Spezzare quindi la parte dello stuzzicadenti che ha ancora la punta, cercando di ottenere una rottura con varie schegge. Intervenire con delicatezza con il coltello sulla scheggiatura per accentuarla, creando ulteriori fessure e schegge, ma stando attenti che esse non si stacchino dallo stuzzicadenti. Rafforzare questa estremità scheggiata cospargendola con il pennello con un sottile velo di colla vinilica molto diulita e lasciar seccare.
Praticare lungo tutta la superficie dell’asta leggere fessure non rettilinee con il coltello, in modo da creare venature del legno che facilitino il lavoro di pittura.
Nell’estremità opposta, che ha un taglio netto, praticare un foro del diametro poco superiore ad uno spillo e della profondità di 3-4 mm. Controllare che lo spillo vi entri con facilità, senza però muoversi troppo.


3) IL PENNONE

    Disegnare sul foglio di lamiera il contorno della bandiera di dimensioni appropriate alla scala della miniatura e alla base su cui sarà posizionata (nel mio caso 12x30 mm, considerando che l’estremità del pennone ulano è diviso in due punte). Ricordarsi di comprendere una parte che andrà ripiegata attorno all’asta.
    Tagliare con il coltello la lamiera secondo la sagoma e con coltello, forbici, punte varie praticare tagli, fori irregolari, slabbrature in alcuni punti della bandiera, per dargli un’aspetto vissuto.
    Arrotolare l’estremità piatta della bandiera attorno allo stuzzicadenti, lasciando un paio di millimetri scoperti rispetto alla parte dell’asta con il taglio netto. Poi con le pinze a becco ondulare la lamiera fino a quando non ha assunto l’aspetto di un tessuto buttato casualmente a terra, seguendo la forma del terreno e di eventuali ostacoli che i troveranno sotto di essa (io ho fatto sì che la bandiera ricoprisse la punta dello stivale del dragone e poi scendesse fuoriuscendo dalla base). Provare più volte l’effetto mettendo l’asta con la bandiera in posizione sulla base, fino a quando non si è soddisfatti.


4) I RIVETTI

    Tenendo fermo il pennone attorno all’asta praticare tre fori passanti attraverso la lamiera e il legno dello stuzzicadenti, equidistanti tra loro e del diametro di uno spillo (nel mio caso 0,3 mm). Inserirvi gli spilli con la testa nella parte superiore e tirare la parte inferiore con le pinze, in modo che la testa degli spilli dall’altra parte deformi leggermente la superficie della lamiera, come se fosse un tessuto inchiodato all’asta. Tagliare quindi la parte degli spilli sporgenti il più possibile a ridosso del punto in cui escono dallo stuzzicadenti e conservare ciò che viene tagliato via. Estrarre gli spilli dalla testa, cospargerli di colla cianoacrilica e reinserirli: essi terranno assicurato il pennone all’asta.


5) LA PUNTA

    E ora la fase più complessa: la punta. Per ispirarmi ho preso a modello foto di reali punte di lancia ulane dell’Ottocento ancora esistenti.


    Come si può vedere, essa è costituita di tre parti, da realizzare separatamente: una barra metallica che collega la punta all’asta, un globo metallico e infine la punta vera a propria.
    Per prima cosa praticare con molta cautela un leggero solco parallelo all’asta nei pochi millimetri che separano l’estremità dello stuzzicadenti dal margine della bandiera: basterà una profondità di 0,5 mm per 0,5 mm. Realizzare con la materia verde (o anche con il plasticard) una sottile striscia che rappresenta la barra metallica e lasciar asciugare.
    Secondariamente, fare una sfera con la materia verde, appiattire la parte superiore e inferiore, fare un foro passante con lo spillo e lasciar seccare.
    Per la punta prendere una parte avanzata di uno dei tre spilli ed eventualmente accorciarlo, in modo che abbia una lunghezza di circa 20 mm, e comunque comprenda la lunghezza della punta, del globo e qualche millimetro perche’ si inserisca nell’asta. Ritagliare nel plasticard due lati della punta di lancia di forma trapezioidale; non preoccuparsi degli spigoli vivi, ci sarà tempo per smussarli poi. Cospargere generosamente di colla cianoacrilica la parte di spillo infilata in un tappo di sughero per supporto e attaccare i due lati di plasticard, cercando di allinearli; lasciar asciugare almeno 10 minuti. Aggiungere con molta attenzione e delicatezza, per non staccare il plasticard, delle strisce di materia verde lungo i due lati dello spillo e lavorandole in modo da renderle più rastremate verso l’apice e più massicce alla base, fino ad unirle in un cilindro alla base. Lisciare e far asciugare.


6) ASSEMBLAGGIO FINALE

    Per montare il tutto, cospargere la striscetta di materia verde con la colla cianoacrilica e inserirla nella fessura in precedenza realizzata nello stuzzicadenti. Su un lato della sfera allargare il foro già praticato con lo spillo con una punta di trapano dello stesso diametro dello stuzzicadenti, cospargere il foro con la colla e inserirlo leggermente sullo stuzzicadenti. 


    Infine rifinire la punta lisciando la materia verde e limando gli spigoli della punta. Poi controllare che essa si inserisca bene nel buco della sfera e il margine inferiore della punta combaci con il lato superiore della palla. Cospargere la parte di spillo rimasta nuda con la colla e inserirla nel buco della sfera, e l’assemblamento è concluso.


    Ed ecco la lancia ulana primerata e in posizione ai piedi del nostro dragone, pronta per essere dipinta!


martedì 15 febbraio 2022

R&D: RODORTUBE

Hello,

we have just created a YouTube channel. On the channel we will exhibit more projects but less detailed than this blog, where we will present fewer projects or at least hints of more detailed projects.

We invite you to follow us and watch our videos on Rodorhammer!


D&R

_____________________________________________________________________

Ciao, 

abbiamo appena aperto un canale YouTube. Sul  canale esporremo più progetti ma meno dettagliati rispetto a questo blog, dove presenteremo meno progetti o almeno accenni di progetti più dettagliati. 

Vi invitiamo a seguirci e a guardare i nostri video su Rodorhammer!


D&R

sabato 15 gennaio 2022

R: CARABINEER OF THE KINGDOM OF SARDINIA (1814) / CARABINIERE DEL REGNO DI SARDEGNA (1814)

    I open another historical digression with respect to my project related to the world of Warhammer. My father obviously liked the last post I wrote about the Napoleonic infantryman; he therefore suggested that I also show a previous miniature that I painted for him last spring, as soon as I resumed the hobby of painting.
    This is a further find in a flea market, which in truth was not meant to be painted. It represents an Italian carabiniere (carabineer) holding a horn, who was part of a series of the carabinieri musical band, whose members are visible in this image taken from the web (our miniature is the same as the one in the center, second row).


    It appears rather disharmonious in the proportions and approximate in the fusion. However, since my father did not want to give up exhibiting it, I accepted his request and decided to try to paint it.
    The miniature at the time of purchase did not even have a wooden base on which to rest, and my father had made a rough one out of lead. I first intervened with green stuff to finish the base, giving it the appearance of a paved street, and in some places to correct casting defects (on a shoulder pad and on the horn). The result, already primed, was this.


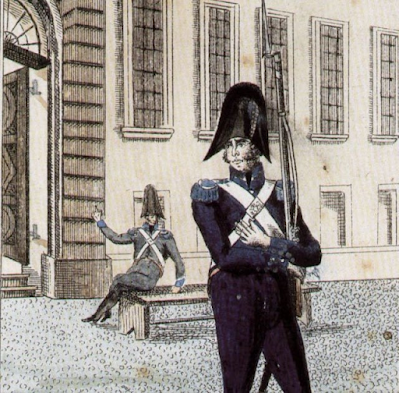
    Then looking for a reference for the colors of the uniform, it seemed to me that the uniform of the miniature did not exactly coincide with any of the current or historical uniforms of the carabinieri, a police corps created in 1814 in the Kingdom of Sardinia and still existing in Italy. The one that seemed to me the closest to the uniform of the miniature is the original one from 1814, even if at this time the carabinieri corps did not have its own band. However, I decided to adopt it for the miniature according to the following print.


    A very simple work on the uniform, where I focused above all on  clean fields of colour, using black lining. I insisted more on the face, to attribute some character to the carabiniere.


    The pictures of the finished miniature have a background inspired by the print above, drawn by D for his grandfather: a door that opens onto a square manned by the carabiniere, with the addition of a nice...watchdog?

_________________________________________________________________________


    Apro ancora una parentesi storica rispetto al mio progetto legato al mondo di Warhammer. L'ultimo post che ho scritto sul fante napoleonico di marina è evidentemente piaciuto a mio padre; egli mi ha così suggerito di mostrare anche una miniatura precedente che ho dipinto per lui nella scorsa primavera, appena ripreso l’hobby della pittura.
    Si tratta di un altro ritrovamento in un mercatino delle pulci, e che in verità non era fatto per  essere dipinto: rappresenta un carabiniere italiano con in mano un corno, che faceva parte di una serie della banda musicale dei carabinieri, i cui membri sono visibili in questa immagine tratta dal web (la miniatura in questione è uguale a quella al centro, seconda fila). 


    Essa appare piuttosto disarmonica nelle proporzioni e approssimativa nella fusione. Visto però che mio padre non voleva rinunciare ad esporla, ho accettato la sua richiesta e ho deciso di provare a dipingerla.
    La miniatura al momento dell'acquisto non aveva neppure la base di legno su cui poggiare, e mio padre gliene aveva realizzato una rozza con del piombo. Io sono intervenuto innanzitutto con la materia verde per rifinire la base, dandogli l’aspetto di un pavimento selciato, e in alcuni punti per correggere dei difetti di fusione (su una spallina e sul corno). Il risultato, già primerato, è stato questo.


    Cercando poi un riferimento per i colori della divisa, mi è sembrato che l’uniforme della miniatura non coincidesse esattamente con nessuna delle divise attuali o storiche dei carabinieri, corpo creato nel 1814 nel Regno di Sardegna e ancora esistente nello Stato italiano. Quella che mi è sembrata la più vicina alla divisa della miniatura è quella originaria del 1814, anche se in quest'epoca il corpo dei carabinieri non aveva una sua banda musicale. Ho comunque deciso di adottarla per la miniatura, secondo la seguente stampa.


    Un lavoro molto semplice sull’uniforme, in cui ho puntato soprattutto su campi di colore netti, usando il "black lining". Ho insistito di più sul volto, per attribuire personalità al carabiniere.


    Le foto della miniatura finita hanno uno sfondo ispirato all’incisione sopra riportata, preparato da D per suo nonno: un portone che dà su una piazza presidiata dal carabiniere, con l’aggiunta di un simpatico cane…da guardia?

R: GNOLL GOSSIP: AA OH6 DOGMEN AGAIN /GOSSIP GNOLL: ANCORA UOMINI CANE AA OH6

    Unfortunately February was a less than productive month for the hobby, but I am able to present some further information on the dogmen o...